 #### Pix2pix: [[Project]](https://phillipi.github.io/pix2pix/) [[Paper]](https://arxiv.org/pdf/1611.07004v1.pdf) [[Torch]](https://github.com/phillipi/pix2pix)
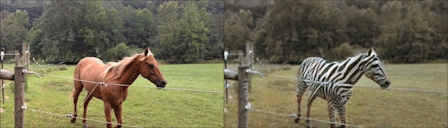
 #### [[EdgesCats Demo]](https://affinelayer.com/pixsrv/) [[pix2pix-tensorflow]](https://github.com/affinelayer/pix2pix-tensorflow)
Written by [Christopher Hesse](https://twitter.com/christophrhesse)
#### [[EdgesCats Demo]](https://affinelayer.com/pixsrv/) [[pix2pix-tensorflow]](https://github.com/affinelayer/pix2pix-tensorflow)
Written by [Christopher Hesse](https://twitter.com/christophrhesse)
 If you use this code for your research, please cite:
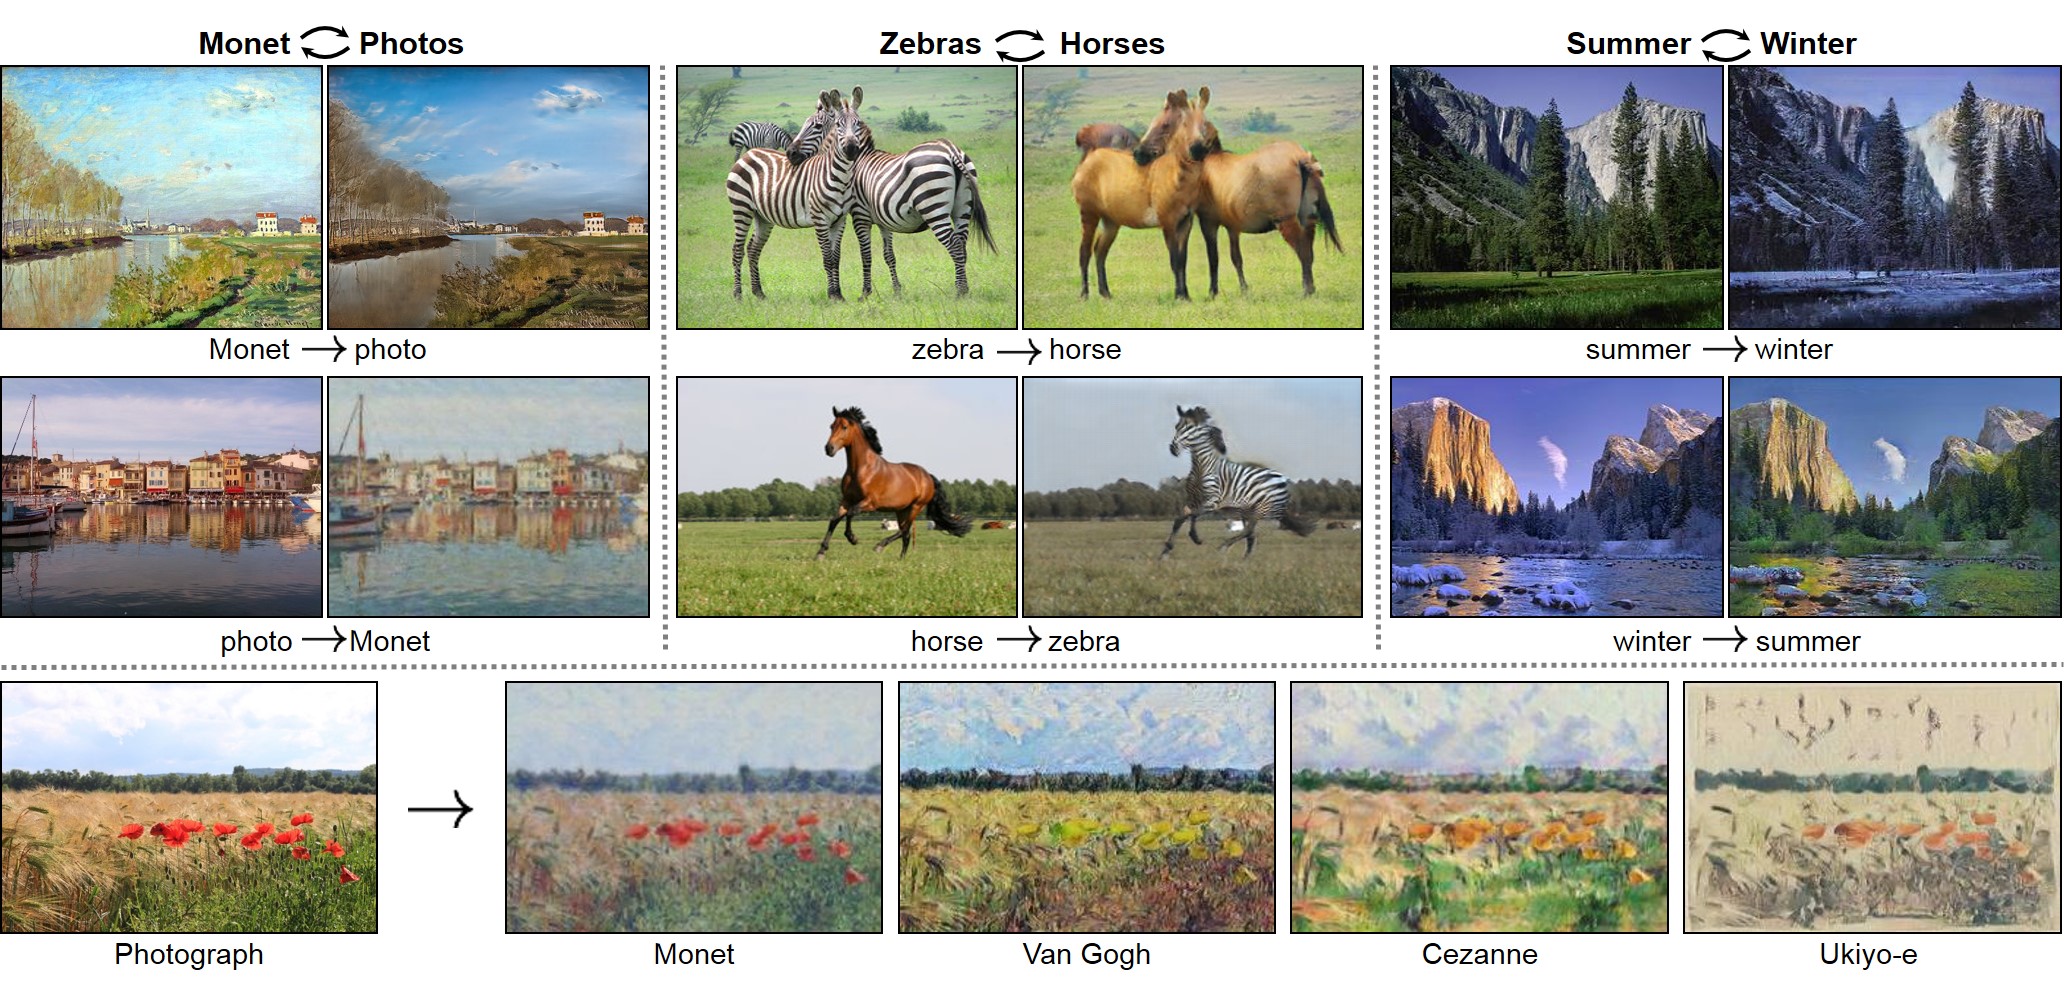
Unpaired Image-to-Image Translation using Cycle-Consistent Adversarial Networks
[Jun-Yan Zhu](https://people.eecs.berkeley.edu/~junyanz/)\*, [Taesung Park](https://taesung.me/)\*, [Phillip Isola](https://people.eecs.berkeley.edu/~isola/), [Alexei A. Efros](https://people.eecs.berkeley.edu/~efros)
In arxiv, 2017. (* equal contributions)
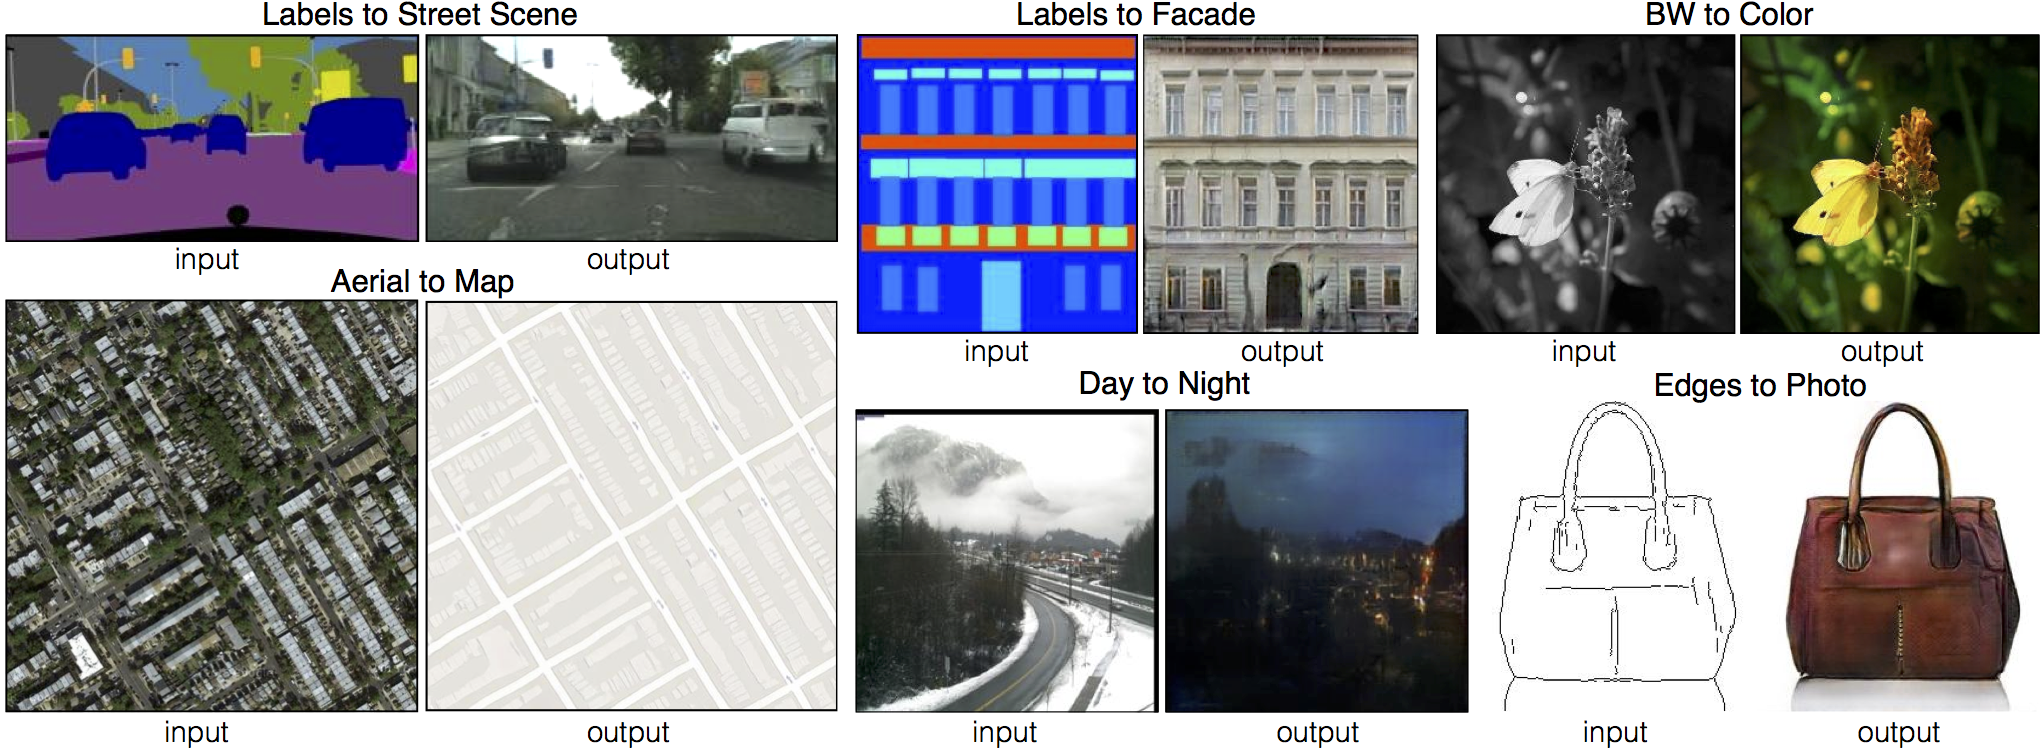
Image-to-Image Translation with Conditional Adversarial Networks
[Phillip Isola](https://people.eecs.berkeley.edu/~isola), [Jun-Yan Zhu](https://people.eecs.berkeley.edu/~junyanz), [Tinghui Zhou](https://people.eecs.berkeley.edu/~tinghuiz), [Alexei A. Efros](https://people.eecs.berkeley.edu/~efros)
In CVPR 2017.
## Other implementations:
### CycleGAN
If you use this code for your research, please cite:
Unpaired Image-to-Image Translation using Cycle-Consistent Adversarial Networks
[Jun-Yan Zhu](https://people.eecs.berkeley.edu/~junyanz/)\*, [Taesung Park](https://taesung.me/)\*, [Phillip Isola](https://people.eecs.berkeley.edu/~isola/), [Alexei A. Efros](https://people.eecs.berkeley.edu/~efros)
In arxiv, 2017. (* equal contributions)
Image-to-Image Translation with Conditional Adversarial Networks
[Phillip Isola](https://people.eecs.berkeley.edu/~isola), [Jun-Yan Zhu](https://people.eecs.berkeley.edu/~junyanz), [Tinghui Zhou](https://people.eecs.berkeley.edu/~tinghuiz), [Alexei A. Efros](https://people.eecs.berkeley.edu/~efros)
In CVPR 2017.
## Other implementations:
### CycleGAN
[Tensorflow] (by Harry Yang), [Tensorflow] (by Archit Rathore), [Tensorflow] (by Van Huy), [Tensorflow] (by Xiaowei Hu), [Tensorflow-simple] (by Zhenliang He), [TensorLayer] (by luoxier), [Chainer] (by Yanghua Jin), [Minimal PyTorch] (by yunjey), [Mxnet] (by Ldpe2G), [lasagne/keras] (by tjwei)
### pix2pix[Tensorflow] (by Christopher Hesse), [Tensorflow] (by Eyyüb Sariu), [Tensorflow (face2face)] (by Dat Tran), [Tensorflow (film)] (by Arthur Juliani), [Tensorflow (zi2zi)] (by Yuchen Tian), [Chainer] (by mattya), [tf/torch/keras/lasagne] (by tjwei), [Pytorch] (by taey16)
## Prerequisites - Linux or macOS - Python 2 or 3 - CPU or NVIDIA GPU + CUDA CuDNN ## Getting Started ### Installation - Install PyTorch and dependencies from http://pytorch.org - Install Torch vision from the source. ```bash git clone https://github.com/pytorch/vision cd vision python setup.py install ``` - Install python libraries [visdom](https://github.com/facebookresearch/visdom) and [dominate](https://github.com/Knio/dominate). ```bash pip install visdom pip install dominate ``` - Clone this repo: ```bash git clone https://github.com/junyanz/pytorch-CycleGAN-and-pix2pix cd pytorch-CycleGAN-and-pix2pix ``` ### CycleGAN train/test - Download a CycleGAN dataset (e.g. maps): ```bash bash ./datasets/download_cyclegan_dataset.sh maps ``` - Train a model: ```bash #!./scripts/train_cyclegan.sh python train.py --dataroot ./datasets/maps --name maps_cyclegan --model cycle_gan --no_dropout ``` - To view training results and loss plots, run `python -m visdom.server` and click the URL http://localhost:8097. To see more intermediate results, check out `./checkpoints/maps_cyclegan/web/index.html` - Test the model: ```bash #!./scripts/test_cyclegan.sh python test.py --dataroot ./datasets/maps --name maps_cyclegan --model cycle_gan --phase test --no_dropout ``` The test results will be saved to a html file here: `./results/maps_cyclegan/latest_test/index.html`. ### pix2pix train/test - Download a pix2pix dataset (e.g.facades): ```bash bash ./datasets/download_pix2pix_dataset.sh facades ``` - Train a model: ```bash #!./scripts/train_pix2pix.sh python train.py --dataroot ./datasets/facades --name facades_pix2pix --model pix2pix --which_model_netG unet_256 --which_direction BtoA --lambda_A 100 --dataset_mode aligned --no_lsgan --norm batch --pool_size 0 ``` - To view training results and loss plots, run `python -m visdom.server` and click the URL http://localhost:8097. To see more intermediate results, check out `./checkpoints/facades_pix2pix/web/index.html` - Test the model (`bash ./scripts/test_pix2pix.sh`): ```bash #!./scripts/test_pix2pix.sh python test.py --dataroot ./datasets/facades --name facades_pix2pix --model pix2pix --which_model_netG unet_256 --which_direction BtoA --dataset_mode aligned --norm batch ``` The test results will be saved to a html file here: `./results/facades_pix2pix/latest_val/index.html`. More example scripts can be found at `scripts` directory. ### Apply a pre-trained model (CycleGAN) - You can download a pretrained model (e.g. horse2zebra) with the following script: ```bash bash pretrained_models/download_cyclegan_model.sh horse2zebra ``` The pretrained model is saved at `./checkpoints/{name}_pretrained/latest_net_G.pth`. - To test the model, you also need to download the horse2zebra dataset: ```bash bash ./datasets/download_cyclegan_dataset.sh horse2zebra ``` - Then generate the results using ```bash python test.py --dataroot datasets/horse2zebra/testA --checkpoints_dir ./checkpoints/ --name horse2zebra_pretrained --no_dropout --model test --dataset_mode single --loadSize 256 ``` The results will be saved at `./results/`. Use `--results_dir {directory_path_to_save_result}` to specify the results directory. - Note: The models trained using Torch and PyTorch produce slightly different results, although we were not able to decide which result is better. If you would like to reproduce the same results in our paper, we recommend using the pretrained models in the Torch codebase. - If you would like to apply a pre-trained model to a collection of input images (rather than image pairs), please use `--dataset_mode single` and `--model test` options. Here is a script to apply a model to Facade label maps (stored in the directory `facades/testB`). ``` bash #!./scripts/test_single.sh python test.py --dataroot ./datasets/facades/testB/ --name {your_trained_model_name} --model test --dataset_mode single ``` You might want to specify `--which_model_netG` to match the generator architecture of the trained model. ### Apply a pre-trained model (pix2pix) Download a pre-trained model with `./pretrained_models/download_pix2pix_model.sh`. - For example, if you would like to download label2photo model on the Facades dataset, ```bash bash pretrained_models/download_pix2pix_model.sh facades_label2photo ``` - Download the pix2pix facades datasets ```bash bash ./datasets/download_pix2pix_dataset.sh facades ``` - Then generate the results using ```bash python test.py --dataroot ./datasets/facades/ --which_direction BtoA --model pix2pix --name facades_label2photo_pretrained --dataset_mode aligned --which_model_netG unet_256 --norm batch ``` Note that we specified `--which_direction BtoA` as Facades dataset's A to B direction is photos to labels. - See a list of currently available models at `bash pretrained_models/download_pix2pix_model.sh` ## Training/test Details - Flags: see `options/train_options.py` and `options/base_options.py` for all the training flags; see `options/test_options.py` and `options/base_options.py` for all the test flags. - CPU/GPU (default `--gpu_ids 0`): set`--gpu_ids -1` to use CPU mode; set `--gpu_ids 0,1,2` for multi-GPU mode. You need a large batch size (e.g. `--batchSize 32`) to benefit from multiple GPUs. - Visualization: during training, the current results can be viewed using two methods. First, if you set `--display_id` > 0, the results and loss plot will appear on a local graphics web server launched by [visdom](https://github.com/facebookresearch/visdom). To do this, you should have `visdom` installed and a server running by the command `python -m visdom.server`. The default server URL is `http://localhost:8097`. `display_id` corresponds to the window ID that is displayed on the `visdom` server. The `visdom` display functionality is turned on by default. To avoid the extra overhead of communicating with `visdom` set `--display_id 0`. Second, the intermediate results are saved to `[opt.checkpoints_dir]/[opt.name]/web/` as an HTML file. To avoid this, set `--no_html`. - Preprocessing: images can be resized and cropped in different ways using `--resize_or_crop` option. The default option `'resize_and_crop'` resizes the image to be of size `(opt.loadSize, opt.loadSize)` and does a random crop of size `(opt.fineSize, opt.fineSize)`. `'crop'` skips the resizing step and only performs random cropping. `'scale_width'` resizes the image to have width `opt.fineSize` while keeping the aspect ratio. `'scale_width_and_crop'` first resizes the image to have width `opt.loadSize` and then does random cropping of size `(opt.fineSize, opt.fineSize)`. - Fine-tuning/Resume training: to fine-tune a pre-trained model, or resume the previous training, use the `--continue_train` flag. The program will then load the model based on `which_epoch`. By default, the program will initialize the epoch count as 1. Set `--epoch_count